Showing posts with label Droplets. Show all posts
Taken awhile back in august 2009. Using a SB-800 flash borrowed from a friend.
Camera Nikon - D90
Lens - Nikkor 18-105
Exposure - 1/200 sec
Aperture - f/9
Focal Length - 105mm
ISO - 200
Flash- SB800 fired from left of the camera.
Increased Contrast and Cropped in Aperture.
Framed in Photoshop.
View On Black
Hit Read More for Metadata 0 comments
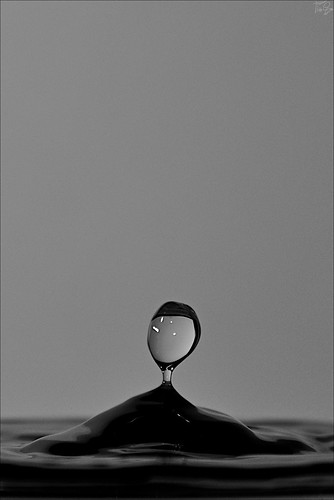
Droplets 4
Published Wednesday, August 12, 2009 by ေမာင္သာဂိ in Black n White, Droplets, photosMy second attempt at shooting Water Droplets. This time all photos are taken in black & white against white background. And i had a flash gun this time, borrowed from Gu Gu for SP Show. Flash is placed on the left side of the camera and bounced off the background. More Photos on my flickr.
0 comments
Droplets 3
Published Friday, July 17, 2009 by ေမာင္သာဂိ in Droplets, photosဒါကေတာ့ တတိယအသုုတ္ပါ။ စာ႐ြက္အျဖဴကိုု ပဲသံုုးထားတာပါ။
Here's the third batch. This also is using white paper as reflector.
Droplets 2
Published Thursday, July 16, 2009 by ေမာင္သာဂိ in Droplets, photosေရစက္ေတြ ဒုုတိယအသုုတ္။ ပထမအသုုတ္ကဟာေတြက ေနာက္ခံ အျဖဴေပၚကိုု မီးထိုးထားတာ။ ဒီအသုုတ္ကဟာက အနီေရာင္မွာ လုုပ္ထားတာ။
This is the second batch of the Droplets. The first batch was shot using a white piece of paper as a background to reflect the light onto the water. In this batch, i used Red.
0
comments
Droplets 1
Published Wednesday, July 15, 2009 by ေမာင္သာဂိ in Droplets, photosမေန႔ညက ႐ိုုက္ထားတဲ့ ေရစက္ေတြထဲက ပထမအသုုတ္။ ေနာက္ထပ္ပံုုေတြ ထပ္လာအုုန္းမည္။ က်န္ေသးသည္။ ပံုုေပၚမွာ Click လုုပ္လိုုက္ရင္ ေရစက္ေတြကိုု ႐ိုုက္ထားတဲ့ဟာအကုုန္ လံုုးကိုုၾကည့္လိုု႔ရတယ္။
First Batch of the Droplets i shot yesterday night. More photos coming up. Click on the photo to view all of the set in one go.
1 comments
Shooting Water Droplets
Published by ေမာင္သာဂိ in Droplets, photos, Tutorialဟုုိတစ္ေန႔က တင္လိုုက္တဲ့ ေရစက္ေလးေတြကိုု High Speed Cameraနဲ႔ ႐ိုုက္ျပထားတဲ့ Video ကိုုၾကည့္ၿပီး လက္ေတြယားေနတာနဲ႔ မေန႔ညက က်ေနာ္ေရစက္ေတြနဲ႔ လက္တည့္စမ္းၾကည့္တယ္။ ဒါေပမဲ့ သူမ်ားေတြ လုုပ္ျပထားတဲ့ဟာေတြ ကိုုလိုုက္ၾကည့္ေတာ့ External Flash Gun တစ္ခုုေတာ့ အနည္းဆံုုးပါတာခ်ည္းပဲ။ အဲ့ဒါနဲ႔ က်ေနာ္လည္း DIY ဆိုုၿပီးေတာ့ ကင္ကမရာကပါတဲ့ Built In Flash နဲ႔ပဲရေအာင္ ခ်မယ္ဆိုုၿပီးသကာလ၊ ေဟာဒီ့ setting ေလးကိုု ေထာင္လိုုက္ပါေကာဗ်ာ။
ေရစက္အတြက္က်ေတာ့ မ်က္ႏွာက်က္ကမီးဆိုုင္းမွာ ေရထုုပ္ကိုုသြားခ်ည္ထားလိုုက္တယ္။ ၿပီးေတာ့ ကင္မရာကိုု သံုုးေခ်င္းေထာက္ေပၚမွာတင္ၿပီးေတာ့ Remote Shutter Release တပ္ထားလိုုက္တယ္။ ေရခြက္ကိုုကင္မရာနဲ႔အဆင္ေျပသလိုု ကိုုယ္သေဘာေခြ႕သလိုု ရေအာင္ ခံုုတစ္ခုုခုု အျမင့္မွာတင္ထားၿပီးေတာ့ သံုုးေခ်ာင္းေထာက္နဲ႔ ညွိတယ္။ ၿပီးေတာ့ Flash မီးေရာင္ျပန္ဟပ္ဖိုု႔အတြက္ကေတာ့ ေရခြက္ရဲ႕ အေနာက္မွာ စာ႐ြက္တစ္႐ြက္ေထာင္ထားလိုုက္တယ္။ ၿပီးေတာ့ Flash ကမီးေရာင္ကိုု ေရစက္ေပၚ Direct မက်ေအာင္လိုု႔ Flash ရဲ႕ ေ႐ွ႕ မွာစာ႐ြက္ေနာက္တစ္႐ြက္ကိုု လက္နဲ႕ကိုုင္ထားလိုုက္တယ္။ Flash Bouncer ေပါ့။ ဒုုတိယပံုုထဲအတိုုင္းပါ။
အိမ္မွာ႐ွိေနတဲ့ခံုုက နိမ့္ေနေတာ့ Tripod နဲ႔ မညီတာနဲ႔ ခံုုေပၚမွာ ေရပံုုးတစ္ပံုုးကိုုေမွာက္ထားၿပီးေတာ့မွ တင္ထားလိုုက္တယ္။ အေနာက္က စကၠဴကိုုေထာင္ဖိုု႔အတြက္ နံရံနဲ႔လည္းကပ္စရာ မ႐ွိတာနဲ႔ စကၠဴရဲ႕အေနာက္မွာ တူကိုု တိပ္နဲ႔ကပ္၊ ၿပီးေတာ့ အဲ့တူကိုု ေရခြက္နဲ႔ သူ႔ေအာက္ကပံုုးမွာ တိပ္နဲ႔ကပ္ၿပီးေတာ့ ေထာင္ထားလိုုက္တယ္။
ၿပီးေတာ့ ေရအိပ္မွာ အပ္ကေလးနဲ႔အေပါက္ေသးေသးေလးေဖာက္လိုုက္တယ္။ က်ေနာ္ကေတာ့ အပ္မ႐ွာခ်င္တာနဲ႔ပဲ နီးစပ္ရာ Stapler က pin တစ္ခုုကိုု ထုုတ္ၿပီးေတာ့အဲ့ဒါနဲ႔ေဖာက္လိုုက္တယ္။ ေရစက္က်တဲ့ေနရာကို Focus ျပတ္ဖိုုက်ေတာ့ ေအာက္က Video မွာပါတဲ့အတိုုင္း ခဲတံကိုုသံုုးၿပီးေတာ့လုုပ္တယ္။ ၿပီးရင္ အဲ့မွာေရစက္က်တာကိုု ထိုုင္ေစာင့္ၿပီးေတာ့ ႐ိုုက္႐ံုုပဲ။ အေနာက္က ေထာင္တဲ့ စကၠဴကိုု အေရာင္အမ်ုဳိးမ်ဳိးေျပာင္းၾကည့္ၿပီးေတာ့ ႐ိုုက္ၾကည့္ေပါ့။ က်ေနာ့ဟာကေတာ့ အိမ္မွာ႐ွိတဲ့ က်ေနာ့ညီရဲ႕ Art paper ေတြကိုုယူသံုုးထားတာ။ အဝါရယ္ အမည္းရယ္ အနီရယ္ပဲ႐ွိေတာ့ ဂ်ာမနီအလံျဖစ္သြားတာေပ့ါ။
ရလာတဲ့ Result ကိုုၾကည့္ခ်င္ရင္ေတာ့ Read More ကိုုသာ Click လိုုက္ေတာ့ဗ်ာ။
ေရစက္အတြက္က်ေတာ့ မ်က္ႏွာက်က္ကမီးဆိုုင္းမွာ ေရထုုပ္ကိုုသြားခ်ည္ထားလိုုက္တယ္။ ၿပီးေတာ့ ကင္မရာကိုု သံုုးေခ်င္းေထာက္ေပၚမွာတင္ၿပီးေတာ့ Remote Shutter Release တပ္ထားလိုုက္တယ္။ ေရခြက္ကိုုကင္မရာနဲ႔အဆင္ေျပသလိုု ကိုုယ္သေဘာေခြ႕သလိုု ရေအာင္ ခံုုတစ္ခုုခုု အျမင့္မွာတင္ထားၿပီးေတာ့ သံုုးေခ်ာင္းေထာက္နဲ႔ ညွိတယ္။ ၿပီးေတာ့ Flash မီးေရာင္ျပန္ဟပ္ဖိုု႔အတြက္ကေတာ့ ေရခြက္ရဲ႕ အေနာက္မွာ စာ႐ြက္တစ္႐ြက္ေထာင္ထားလိုုက္တယ္။ ၿပီးေတာ့ Flash ကမီးေရာင္ကိုု ေရစက္ေပၚ Direct မက်ေအာင္လိုု႔ Flash ရဲ႕ ေ႐ွ႕ မွာစာ႐ြက္ေနာက္တစ္႐ြက္ကိုု လက္နဲ႕ကိုုင္ထားလိုုက္တယ္။ Flash Bouncer ေပါ့။ ဒုုတိယပံုုထဲအတိုုင္းပါ။
အိမ္မွာ႐ွိေနတဲ့ခံုုက နိမ့္ေနေတာ့ Tripod နဲ႔ မညီတာနဲ႔ ခံုုေပၚမွာ ေရပံုုးတစ္ပံုုးကိုုေမွာက္ထားၿပီးေတာ့မွ တင္ထားလိုုက္တယ္။ အေနာက္က စကၠဴကိုုေထာင္ဖိုု႔အတြက္ နံရံနဲ႔လည္းကပ္စရာ မ႐ွိတာနဲ႔ စကၠဴရဲ႕အေနာက္မွာ တူကိုု တိပ္နဲ႔ကပ္၊ ၿပီးေတာ့ အဲ့တူကိုု ေရခြက္နဲ႔ သူ႔ေအာက္ကပံုုးမွာ တိပ္နဲ႔ကပ္ၿပီးေတာ့ ေထာင္ထားလိုုက္တယ္။
ၿပီးေတာ့ ေရအိပ္မွာ အပ္ကေလးနဲ႔အေပါက္ေသးေသးေလးေဖာက္လိုုက္တယ္။ က်ေနာ္ကေတာ့ အပ္မ႐ွာခ်င္တာနဲ႔ပဲ နီးစပ္ရာ Stapler က pin တစ္ခုုကိုု ထုုတ္ၿပီးေတာ့အဲ့ဒါနဲ႔ေဖာက္လိုုက္တယ္။ ေရစက္က်တဲ့ေနရာကို Focus ျပတ္ဖိုုက်ေတာ့ ေအာက္က Video မွာပါတဲ့အတိုုင္း ခဲတံကိုုသံုုးၿပီးေတာ့လုုပ္တယ္။ ၿပီးရင္ အဲ့မွာေရစက္က်တာကိုု ထိုုင္ေစာင့္ၿပီးေတာ့ ႐ိုုက္႐ံုုပဲ။ အေနာက္က ေထာင္တဲ့ စကၠဴကိုု အေရာင္အမ်ုဳိးမ်ဳိးေျပာင္းၾကည့္ၿပီးေတာ့ ႐ိုုက္ၾကည့္ေပါ့။ က်ေနာ့ဟာကေတာ့ အိမ္မွာ႐ွိတဲ့ က်ေနာ့ညီရဲ႕ Art paper ေတြကိုုယူသံုုးထားတာ။ အဝါရယ္ အမည္းရယ္ အနီရယ္ပဲ႐ွိေတာ့ ဂ်ာမနီအလံျဖစ္သြားတာေပ့ါ။
ရလာတဲ့ Result ကိုုၾကည့္ခ်င္ရင္ေတာ့ Read More ကိုုသာ Click လိုုက္ေတာ့ဗ်ာ။
After Watching That Time Wrap Video of the droplets, my hands have been itching to try that out. So i did it yesterday night. I did a little research on how to set up and most of the videos i found are using at least one external flash gun. I decided to DIY and make it work with my built in flash. Here is how i set up for the shot.
A bag of water was hanged above the big tray filled with water. My tray was put on top a little stool and a overturned bucket because i couldn't find a stool that's high enought for my tripod. The camera was fixed onto the tripod with a remote shutter release attached. To bounce of the flash light as shown in the video below, i erected a piece of paper at the back of the tray. The paper was erected by taping a chopstick on the back of the paper and to the bucket. Then i used another piece of A4 paper to deflect the flash light from the droplets and to the background by holding it in front of the flash, as shown in the second picture above.
Experiment with different colors of papers as the background to add color to the droplets. In this set up i used my brother's art papers. Since i can only find Yellow, Red and Black mine looked like a Germany Flag.
Then a little is hole is punctured using a stapler pin. Supposed to use a needle but i just used what's in the reach of my arm. And after that the rest is pretty much waiting patiently.
Hit read more to see the result i came up with.
A bag of water was hanged above the big tray filled with water. My tray was put on top a little stool and a overturned bucket because i couldn't find a stool that's high enought for my tripod. The camera was fixed onto the tripod with a remote shutter release attached. To bounce of the flash light as shown in the video below, i erected a piece of paper at the back of the tray. The paper was erected by taping a chopstick on the back of the paper and to the bucket. Then i used another piece of A4 paper to deflect the flash light from the droplets and to the background by holding it in front of the flash, as shown in the second picture above.
Experiment with different colors of papers as the background to add color to the droplets. In this set up i used my brother's art papers. Since i can only find Yellow, Red and Black mine looked like a Germany Flag.
Then a little is hole is punctured using a stapler pin. Supposed to use a needle but i just used what's in the reach of my arm. And after that the rest is pretty much waiting patiently.
Hit read more to see the result i came up with.
0 comments
Rain Droplets
Published Monday, May 18, 2009 by ေမာင္သာဂိ in bokeh, Droplets, Rain, SP
Taken at SP library new extension while it's raining today.
1/200,
f5.6,
ISO 400.
Taken with the pop up flash from my camera.
Subscribe to:
Posts (Atom)


.jpg)